Instragram is a cool free photo sharing service that works with Apple iOS and Android devices. It allows you to take photos that are reminiscent of Polaroid pictures with some unique lighting effect. You can share photos with friends on Instagram and post them to other social media sites. They boast of 15 million users and with its recent acquisition by Facebook, it’s expected those numbers will continue to grow.
Instagram is fun, and it can be used to enhance and promote your business. Let’s get started with the ‘how-to’s’ first, and then we’ll talk about some great uses for this app.
The app is demonstrated below using an iPhone.
Step 1: Download the App from your App store
Search for “Instagram” in the Apple or Android store and download it.
Step 2: Open Your App and Sign Up
When you first open the app, you’ll be invited to sign up for an account. Click “Okay” and then you can either sign up for an account or if you already have one, you can choose the “Login” option at the bottom of the screen.
To create your account, you need to add your email address, choose a username and add a password. You can also add your phone number and upload a picture of yourself. Just choose a photo from your device or take a new picture if you prefer. Click “Done” at the top right when you’re finished.
Step 3: Push Notifications or Not?
 At this point, the app will ask you if you want push notifications. This means you’ll be notified whenever someone adds you as a friend, comments or likes one of your photos.
If you choose “OK” and then later want to turn it off or modify the specific settings, it’s easy to do. Just click the icon on the bottom right of the app that looks like this: ![]()
Then select “Edit Profile”.
At the bottom of this screen, you’ll see “Push Notifications”
Here you can choose which notifications you receive and who can send them to you.
Step 4: Find and Add Friends
Now you’ll be invited to find your friends and add them on Instagram.
 You can search the contacts and your device and invite them personally. You can also see which of your Facebook and Twitter friends are on Instagram and start following them. And finally, you can simply search for someone to see if they are on Instagram.
Adding friends is optional and you can skip this for now, if you prefer. Instagram allows you to post your photos to Facebook, Twitter and other social media sites, so you can come back and grow your Instagram Followers list later if you’d rather.
Click “Next” in the top right corner when you’re done adding friends or if you want to skip this step.
If you’re not sure who to follow, you can select some people from Instagram’s popular user list:
Step 5: Start Taking Pictures
Now comes the fun part, taking and sharing pictures. You can do this by choosing the little camera icon at the bottom of the screen.
![]() You can start taking photos as you normally would with your device or you can choose photos already on your device. To work with a photo on your device, click the photo icon on the bottom left of the screen that looks like this:
You can start taking photos as you normally would with your device or you can choose photos already on your device. To work with a photo on your device, click the photo icon on the bottom left of the screen that looks like this: ![]()
In our example, we’ve taken a photo and are going to work with that. When you take your picture, you’ll see you have a number of different lighting options. Here’s a screenshot below of most of those options.
 Choose whichever one you’d like and you can click the green checkbox when you’re done. The app will save the picture onto your camera.
You can also add or remove the frame on your picture if you prefer by clicking the frame icon at the top left of the app screen.
![]() You can also create a blurred effect with the drop icon at the top as well.
You can also create a blurred effect with the drop icon at the top as well.
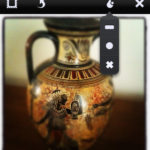
![]() When you tap on the drop icon, you’ll see options on how the blur will appear on the photo. The round blur has been chosen below.
When you tap on the drop icon, you’ll see options on how the blur will appear on the photo. The round blur has been chosen below.
Now you can also add a caption to your photo and add your location, if you’d like.
Step 6: Photo Sharing
As mentioned earlier, you can share your photos on social media as well, but you need to configure your settings and give the Instagram app permission to do that.
 Once you’ve configured the sites you want, you need to click the green “Share” button to send the photo to the sites you want.
We’re choosing to share on Facebook. Once we click “Share”, we add a description and then click the blue check mark to send it to Facebook.
The picture is then automatically added to Facebook, where your friends there can comment, like and share your photo too.
Step 7: Interacting on Instagram
Instagram also has useful interaction capabilities and there are always great photos to look at. You always have the option to “Like”, comment on or Tweet a photo that you see.
At the bottom of each photo, you’ll see “Like” and “Comment”. Just tap the like and it will show that you liked this photo. You can also go back and see all your likes later, so it’s like making a little collection of photos for yourself.
 Commenting is pretty straightforward too. Just click the “Comment” icon as shown above. Then leave your message:
You’ll also notice another icon to the right of the comment option that looks like this: ![]()
This allows you to flag any inappropriate photo or Tweet it on Twitter.
Instagram is a fun tool for sharing your photos and helps you create some very attractive photos with your device, even if you’re not a great photographer. Get on and start sharing!
As usual here, I’ll continue on this topic with more information over the next few days.


0 Comments
Trackbacks/Pingbacks