
LeadPages – Step by Step
 With a little bit of practice, you can build opt in forms, squeeze pages, sales pages, social media pages, webinar promotion pages, optimized 404 pages, video pages, thank you pages, launch pages, upsell pages, pop ups and exit pop ups and much more in an hour or less using LeadPages. If you haven’t already, checkout my post, Better Conversions with Landing Pages, to learn how Landing Pages really work.
LeadPages has many different templates available. Once you’ve created your account, you can get started right away.
The first thing you’ll see after you create your account with LeadPages and sign in is a top menu that looks like this:

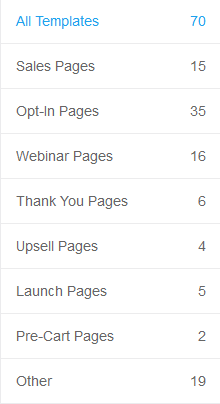
Templates — If you click Templates you’ll be taken to the entire list of available templates.
LeadPages™ — Clicking here will show you any pages you’ve created with the option to also create an A/B split test page.
LeadBoxes™ — This is a neat feature that allows you to make just a small box to capture leads instead of an entire page.
LeadLinks™ — Available only to pro customers, you can use this to improve your conversations for people who have already opted in to your list, by this way sign up for things via an email link without other steps.
Support — If you click support, a window will pop up allowing you to ask a question. Type in your question and then a variety of responses will be given, and if those don’t work you can click “none of these are helpful — get in touch”.
My Account — If you click on this you’ll bring up another menu that looks like this:
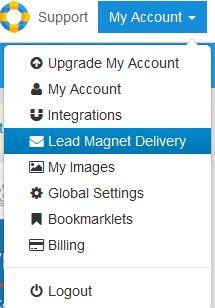
From there, you can upgrade your account, add integrations with your email autoresponder software, shopping cart software, webinar software or others.
This will unleash more functionality for you. You can also use features they are trying out in Beta such as the current Lead Magnet Delivery feature which allows you to upload a file that your leads will be promoted to download. This is also where you will store your images, change “powered by” settings, and more.
The left tool bar is also present. It looks like this:
This is just a way to access each type of template more quickly. So, if you want to create a Sales Page, for instance, you would click on Sales Pages to view the many different choices of layouts. Once you choose the template you like, you can get started; which is exactly what this demonstration will show.
Choose Sales Pages from LeadPages
As you can see you can now choose to use the Template featured, or you can scroll down and look at the many other choices such as Google + Hangout Pages, Super Simple Sales Pages, eBook Landing Page, Long form Sales Page with Video and so forth. You can also sort by conversion rates to see which one converts best.
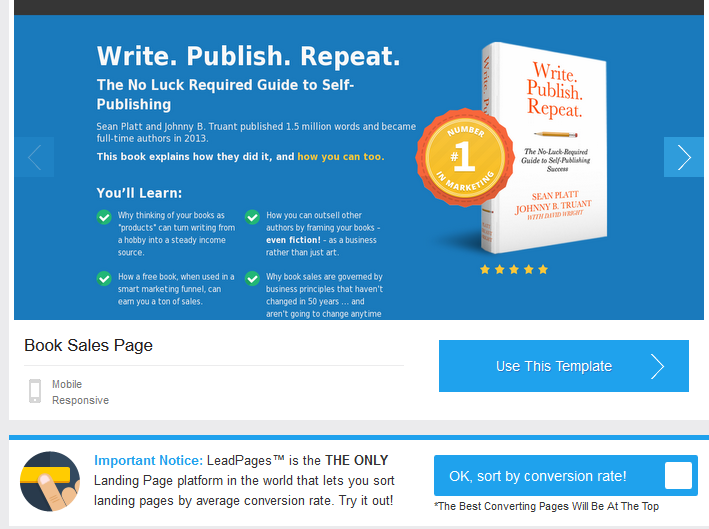
We are going to choose the eBook Landing Page:
Simply move your mouse over the choice and an image will appear that says: Use This Template — click it.
You can also choose to watch a tutorial instead of clicking it right away. The tutorials offered by the LeadPages team are really useful if you feel lost. But, it’s so easy to use that more than likely you will not need them for most features.
Once you click through you’ll be taken the page that enables you to edit the template easily.¬
Above this window is a tool bar that looks like this : 
To the left are many choices about the parameters and page content. This is a small sampling of the choices that go down the left side of the page.
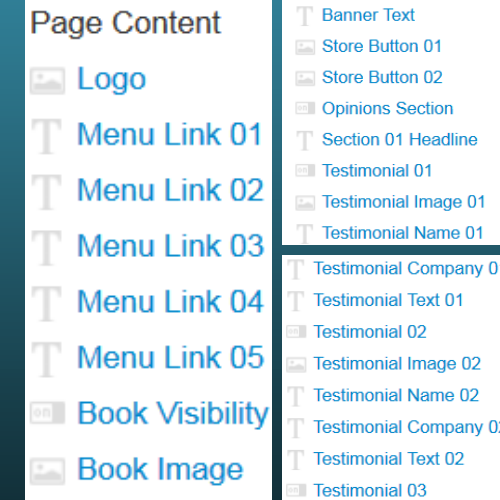
To edit each part just click on that area to the left, or directly on the area right on the template.
For instance, when you click on the book, a screen appears to the left like this: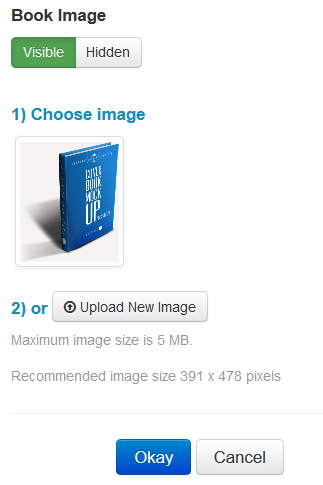
As you can see, you can make the image disappear or change it. This is how it works for every aspect of the page, just click where you want to edit, the ability to edit pops up on the left side of the page, then make the changes you want whether it’s your logo, the text on the page, a menu item, or something else.
Click the area, and then use the editing area to change. For example, you can click on Opinions

which will bring a window up on the left like this:
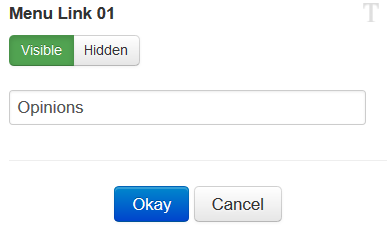 Notice that you can change the word “Opinions” to something else by just typing in the box.
Perhaps we want to change it to Testimonials. Simply type in the word you want in the box, then click Okay. Now the top menu under your logo has changed to the word you want.

You can proceed with the entire sales page by clicking and changing the words, and the images until you are done and have an entirely unique page.
As you click on each area to edit, you’ll quickly create a landing page that works for your needs and is unique to your audience.
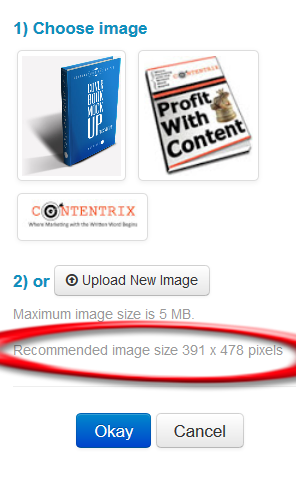
For best results, try to replace images shown with images that are the same size. You can find out the size of any image is by right clicking on it, downloading it and checking the size in a graphics program or by using a plugin like Firebug for your browser. In addition, LeadPages tells you in the left side of the menu the recommended size.
 Once you know the sizes just have your graphic designer make them the size you need. Always click “OKAY”. When you’re done simply click Save. Then you’ll notice a new feature shows up in the tool bar called analytics.
![]()
• A/B Testing –If you have a Pro Account you’ll be able to take advantage of the A/B testing features as well. A/B testing is a good way to determine which sales pages work best for your particular audience. Usually you’ll change just one element be it layout or words used and then use both sales pages at the same time and see which one converts best.
• Analytics — From here you also set up your analytics. Just click Analytics on the top menu bar. Pick a date to get started and you can see how many views or unique views your page has received during a specific time period. Finally, when you’re ready you can publish your new page.
• Preview — Once you’ve saved you can preview what your page looks like prior to publishing it.
• Save — You must save before publishing or previewing. If you forget it will prompt you to do it.
• Publishing — In order for the publish feature to work you’ll have had to set up all the General Parameters. This includes integrating with WordPress, Facebook, Autoresponders or other software.
In addition, you should also set up SEO, tracking codes, style settings, dynamic controls like share buttons, messages that appear with shares and more. You can also set up an exit pop up or redirect from here. In addition, you can help LeadPages with collecting statistics by choosing which industry your niche is in.
Once you click publish, LeadPages assigns a URL to your new page to redirect your audience to. Conversely you can also publish to WordPress directly using a WordPress plugin.
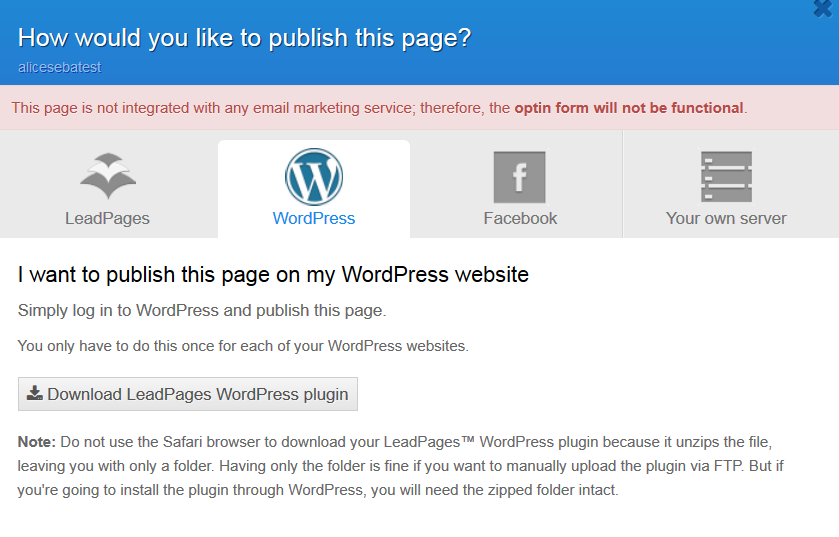 To get the plugin follow the instructions regarding which browser to use. Once you have the plugins for WordPress it’s super simple to publish LeadPages whenever you want. As you can see, using LeadPages makes the process of creating all your “money pages” much easier and less labor intensive.
You can even choose to download the new page to your computer in HTML format to upload to your own server. There are no restrictions on how you use LeadPages to create. You could actually use LeadPages to create an entire website, although you really don’t need to do that.
Most of the thought to layout and design has already been done by the experts, and only converting designs are used. You can be assured that your LeadPages will get conversions if you send the right traffic to it.
Now that you have taken the tour of LeadPages, tomorrow I’ll cover: Tips to Make Using LeadPages Work Harder
Share this article with these Tweetables:
• How to make LeadPages work for your business sales – Click to Tweet
• Learn how to set up and use LeadPages for more sales – Click to Tweet
• Would you like more traffic and sales? Try LeadPages – Click to Tweet
• @SusanGilbert shows you how to set up LeadPages for more sales – Click to Tweet

0 Comments